Recent Posts

Tags:

Google Adsense training make money

By Unknown → Friday, February 12, 2016

It's amazing how fast Valentines day can sneak up on us. It seems as though it was just yesterday that I finished packing up the rest of the Christmas decorations. 

Thankfully, DIY Cozy home has put together a great list of DIY Valentine's decor. 


View the entire list at:


Stay up-to-date on any new printables, tips, tutorial, recipes, family fun, and much more by joining DIY Home Sweet Home's social networks.
{click on an icon below}

Image Map
Tags:

50 DIY Creative Valentine's Decorations

By Unknown → Thursday, January 28, 2016

I think we can all agree that life is complicated. I'm a huge fan of anything to make life a little easier. Viral Nova has gathered up 25 creative tips to help you do just that. From organizing your frozen veggies to a new way to eat Cheetos without the mess. 


Check out these tips and more at...

Viral Nova - 25 Easy and Creative Life Hacks

If you enjoyed this post, don't forget to pin it for later.


Stay up-to-date on any new printables, tips, tutorial, recipes, family fun, and much more by joining DIY Home Sweet Home's social networks.
{click on an icon below}

Image Map
Tags:

25 Creative Life Hacks

By Unknown → Wednesday, January 27, 2016
When we purchased our 1960 farm house there were a couple old windows left up in the attic. I had the idea to transform one of the windows into a message board. When I was asked to review a set of liquid chalk markers, it seamed like the perfect opportunity!


How to transform an old window into a message board:


1. Give the window a good washing to remove the majority of the dirt. (I used the jet setting on my garden hose and it worked perfect.)


2. Use a box knife to cut off any pieces of old caulking.


3. If there are any metal pieces holding the glass in place, use a pair of pliers to remove them. Once these are removed the glass should easily pop out of the frame. Once the glass is out fill a bucket with hot soapy water and using a scrub brush, scrub the entire frame to remove any remaining dirt.


4. Use the pieces of glass as a template to cut out your chalkboard pieces. (You can find chalkboard at your local hardware store or make your own using any kind of thin board and painting it with chalk board paint.) A table saw would make cutting a lot simpler but if you don't have one you can score the board with a box cutter and break the piece off. 


5. For the center piece use a couple pieces of cardboard cut to size and cover them in fun fabric. The cardboard allows you to use pushpins to attach notes and keep them in a visible location. 


I decided to use one side to keep track of to dos and the other side was perfect for a shopping list. 


I absolutely love the vibrant neon colors of the ChalkOla Chalk Ink Markers. They perfectly matched the bright, fun fabric that I chose. 


These neon markers contain liquid ink so when you first receive them you'll notice the tips are white. 


Using some scrap paper, press the tip down for a couple minutes. You'll soon see the ink running down the tip of the marker. You'll only have to do this to new markers. Once used the ink will flow smoothly.


I love the huge tips on the larger chalk markers. They make larger projects a lot easier.

I love that these markers don't smear easily like regular chalk. This makes them perfect for using with projects that may be handled a lot or in a classroom or other area with kids who like to touch things. The package states that they are best used on non porous surfaces such as glass, whiteboard, mirrors, plastics, chalkboards, and ceramics.

I was amazed at how vibrant the colors looked against the dark chalkboard and couldn't wait to test them on other surfaces. We have beautiful glass door that separates our living room from our dining room. I decided it would be fun to decorate it for the upcoming holiday! 


Ok, so I may not be the best artist but my kids where pretty excited about the window so that's!!

You can purchase your own chalk markers on the ChalkOla website or at amazon HERE (15mm Markers) or HERE (6mm Pens) .

Get 20% off!!!

  • Enter the code CHK20OFF to get 20% off the 15mm Markers.
  • Enter the code CHALK20A to get 20% off the 6mm Pens.


If you enjoyed this post, don't forget to pin it for later.


Disclaimer: In exchange for this post I received a free set of chalk markers. All opinions are 100% mine.


Stay up-to-date on any new printables, tips, tutorial, recipes, family fun, and much more by joining DIY Home Sweet Home's social networks.
{click on an icon below}

Image Map

Diy Message Board Using Recycled Window and Neon Chalk Markers

By Unknown → Monday, October 26, 2015

By Kerrie Kelly, ASID

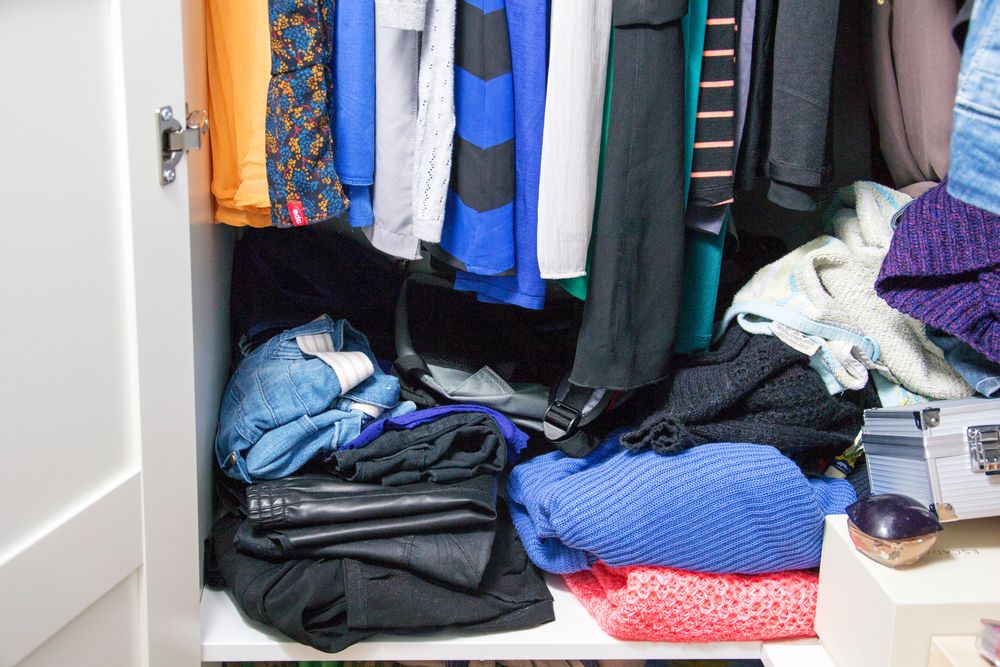
Everyone knows that the humble hallway closet is a workhorse. From being used as a trash bin, stowage spot, and then tossed and turned when a certain pillowcase is nowhere to be found, the closet gets more than its share of abuse—and it shows. Are you ready to get that chaos under control? We’ve taken the liberty of rounding up a few of our favorite ways to organize the space using a system customized just for you and your needs.

Curate and Control


Possibly the most freeing exercise in all of closet cleaning is the purging. Grab a trash bag (or 10) and head to your closet to look closely at each individual item within. If it has sentimental or monetary value, stow it somewhere else. If you didn’t even realize you owned it, you probably don’t need it, and you can take it to your local thrift store. Do this with every item and we promise you’ll already notice a difference. And avoid taking breaks—we’ve learned that it’s easiest and most efficient to complete this step in one fell swoop.

Planning is Key


Now that you have a fresh, clean space, it’s time to decide what the closet is going to be used for. Is it for linens and towels? Do you need a second closet for your clothes and shoes? What about knick-knacks and arts and crafts? If you’re still unsure about what you’re using the space for, start grouping similar items together and you’ll inevitably see what makes the most sense for you. Group and regroup the selected items to organize everything as neatly as possible before you even think about putting anything back in the closet.

Very Vertical

For whatever reason, most of us try to stuff all that we can in the shelving we’re given. Usually that shelving isn’t very deep and doesn’t give us as much room as we’d like. By installing higher shelving or an extra rod or two, you can take advantage of unused space. This allows for you to store more items than you had originally planned, resulting in a more thoroughly organized unit overall.

Baskets vs. Boxes


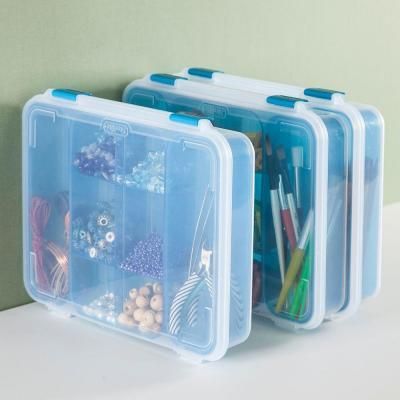
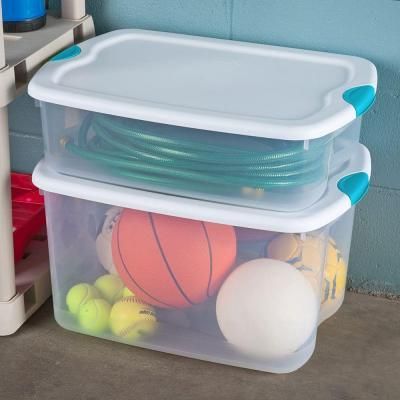
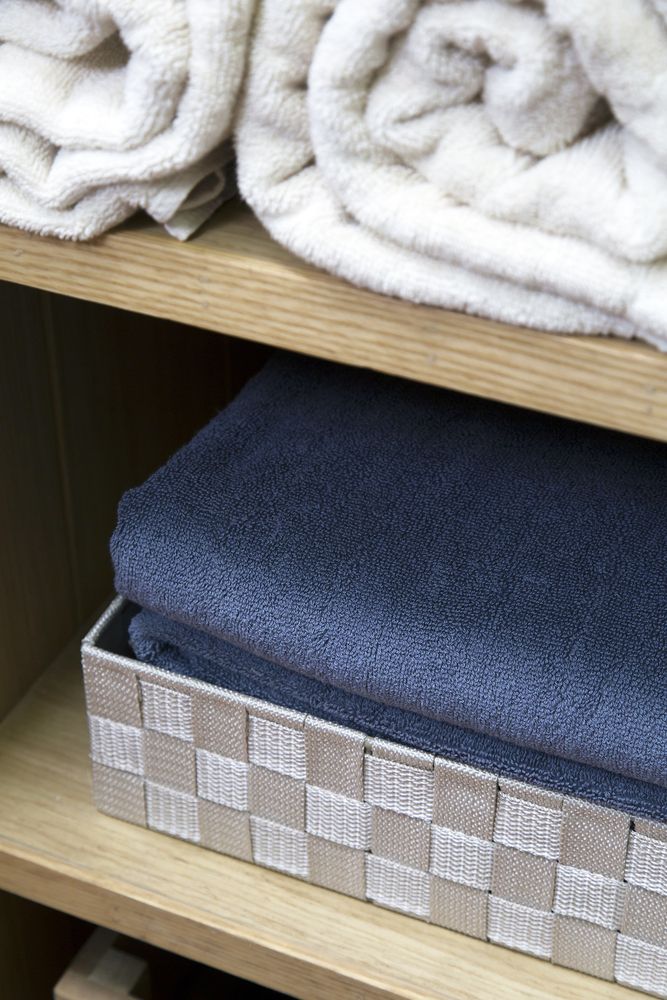
Once you’ve gotten all of your shelving in place, it’s time to take a look at the subgroups you’ve created in the previous steps. If your closet is for extra shoe storage, group your shoes similarly and put them in baskets. Baskets are best for items you use regularly because they don’t usually have tops, and they’re woven and opaque—meaning it’ll be easier for you to spot the specific style you’re searching for. If your closet is for art supplies, opt for boxes or bins. Smaller items that can get lost more easily are best stowed in well-labeled plastic or cardboard boxes and bins because they won’t fall through any cracks or ruin fabric. Also, make sure the bins and boxes have lids so that you can stack them on top of each other, with the most rarely used items being at the bottom.

Doors and Floors

If you’ve finished curating, editing, and stowing, and you’re still left with a pile of stuff, look to the door and the floor. Try hanging an over-the-door plastic organization system to free up some space in your shelving. This is great for small items like toiletries and craft materials. If your space allows for it, add a few small boxes to the floor level of your closet that can be stacked or moved easily in case you need extra reach. Select a style that you don’t mind being on display, because you might have to move these smaller boxes around a bit.

Maintenance is a Must


Now that you’ve successfully maneuvered through the chaos and created a closet you want to keep on display, maintenance is crucial. We recommend going in monthly and checking to make sure items are in their correctly labeled bins and boxes, and maybe adding more if you’ve accumulated anything else. By maintaining the results of your hard work, you can rest assured that everything’s in its proper place—at least in your hall closet.

Professional interior designer Kerrie Kelly has been helping homeowners achieve beautiful closet designs while also providing wonderful storage capabilities. Kerrie writes about her blended design and organization expertise for The Home Depot. To view a selection of Home Depot's closet storage accessories, you can visit the company's website.


Stay up-to-date on any new printables, tips, tutorial, recipes, family fun, and much more by joining DIY Home Sweet Home's social networks.
{click on an icon below}

Image Map

How to Get Your Hall Closet Havoc Under Control

By Unknown → Tuesday, August 25, 2015

Powered by themekiller.com